

Automations and specialized agents
Schedule recurring jobs for the agent, react to new emails or documents, use blueprints and set up specialized agents for their own areas of work.
Open in ClapilotAn automation is a job for the agent that runs by itself: every morning, once a week or whenever a new email, a new document or a new calendar entry arrives. Specialized agents are separate agents with their own area of work, their own skills and their own memory. You find both under Automations in the menu.
When you first open them: new accounts see a short introduction for automations and one for specialized agents, in which they create their first automation or agent from a blueprint. The same introductions start from the Let work run by itself step of the introduction at first sign-in. See Module introductions.
The overview
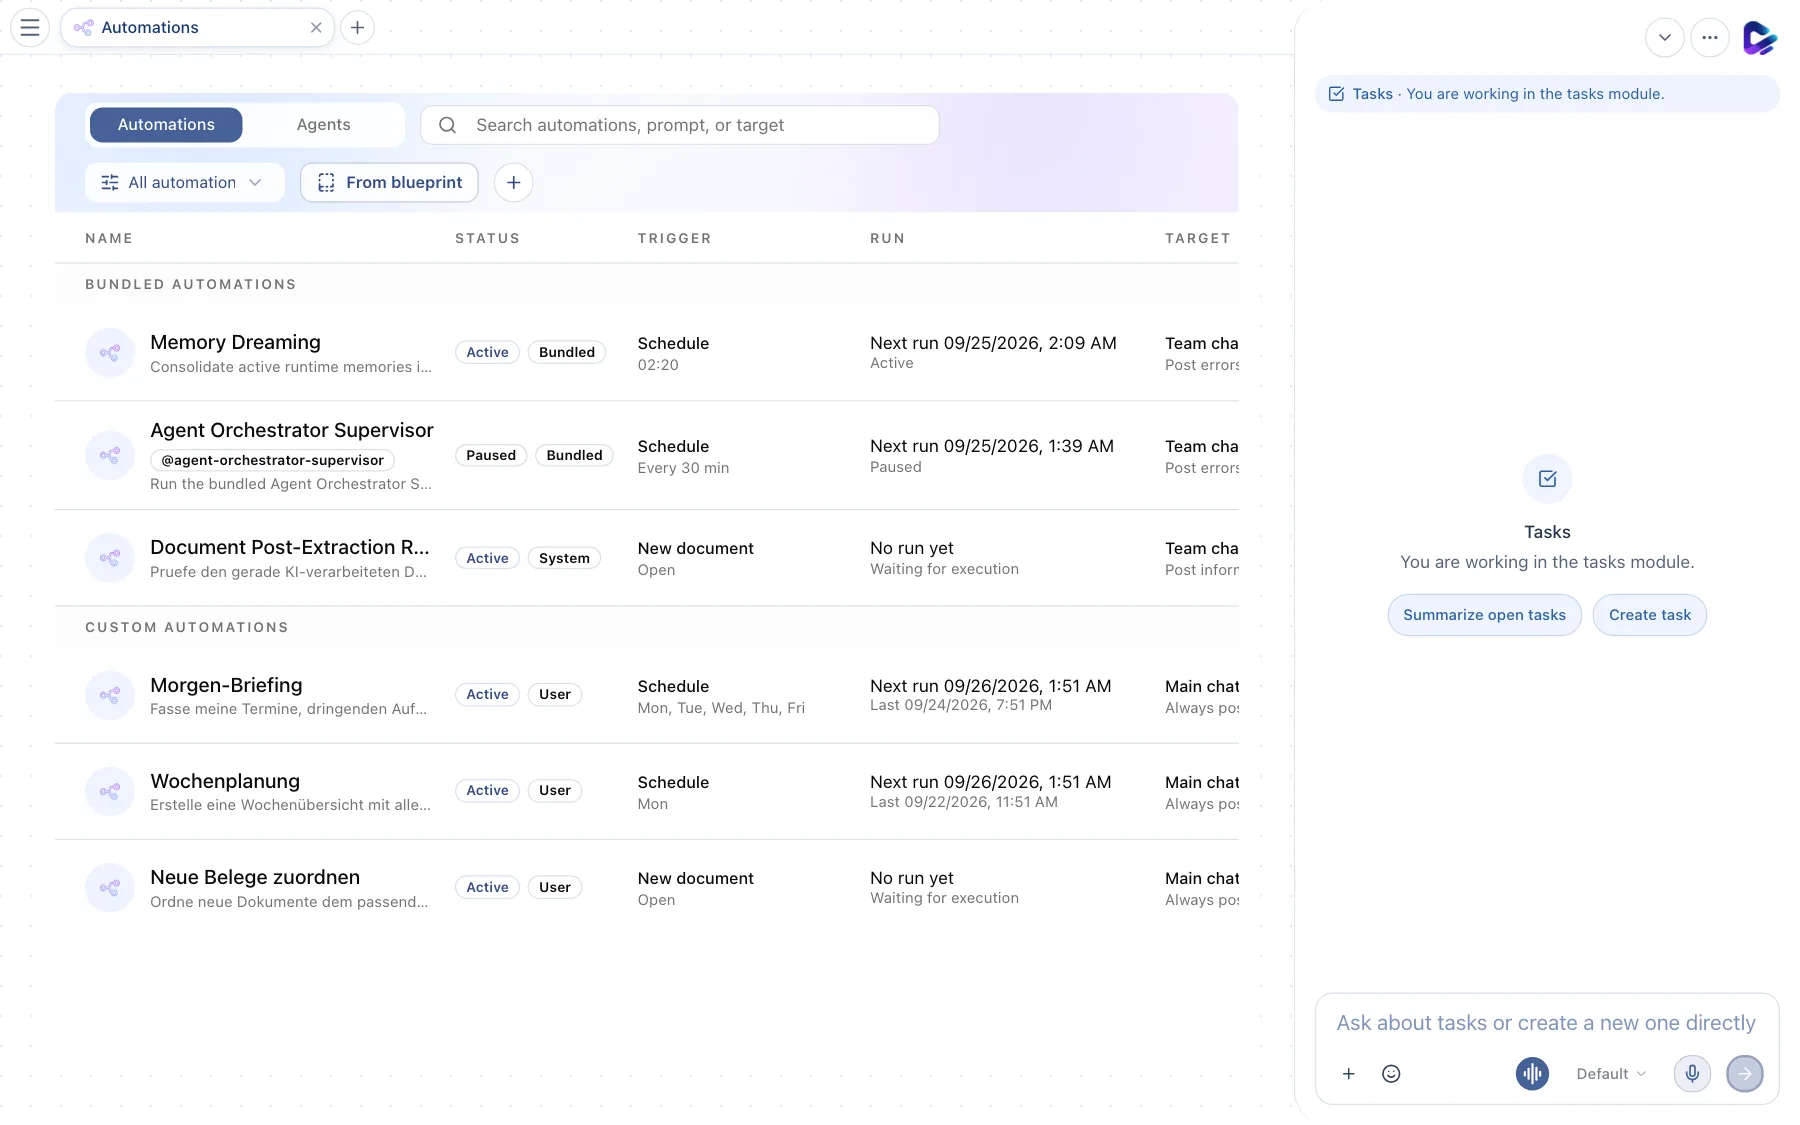
- Automations – the list of all automations.
- Agents – switches to the specialized agents (see below).
- Search – by name, prompt or target.
- Filter – by user, bundled and system automations, by status and by trigger.
- + New – creates a new automation: describe it and let Clapilot set it up, build it manually in the visual editor, or start from a blueprint (see below).
- Automation – click it to open it for editing.
The list is split into Bundled automations, which come with Clapilot, and Custom automations, which your team created. The columns show the Status (Active or Paused), the Trigger, the next and last Run and the Target that receives the result. At the end of each row – scroll to the right in narrow windows – you find the actions Run log, Run automation (start it now), Pause automation or Activate automation, and Delete automation. You can pause bundled automations, but not delete them.
Creating a new automation
+ New opens a short wizard – in the automations overview as well as on the Agents tab for new specialized agents:
- A short intro shows what automations or agents do for you. Next takes you to the description.
- Describe in your own words what should happen – for example "Every workday at 8 am, summarize my unread e-mails" or "An agent that checks incoming invoices and flags anything unusual". The Ideas below fill the field with an example.
- Set it up – Clapilot writes the name and instructions and picks from what your instance offers: for agents the matching tools, skills and connections; for automations the schedule or trigger, matching skills and the actions it may take without asking – for example e-mailing a report when you describe it that way. Deleting is never pre-approved. A checklist shows what it is working on.
- Finally you see what was set up. Chat with agent opens the new agent in Team Chat, Adjust opens its settings if you want to change something.
If it doesn't work out, describe it in a bit more detail and try again.
Create manually below the input opens the visual editor in the same window: trigger, agent and output as nodes, with the selected node's settings on the right. Every option is available here – webhooks, Home Assistant, several agents, folder filters. The save icon creates the automation. For specialized agents, Create manually opens the full agent editor on the Capability Graph.
Creating an automation from a blueprint
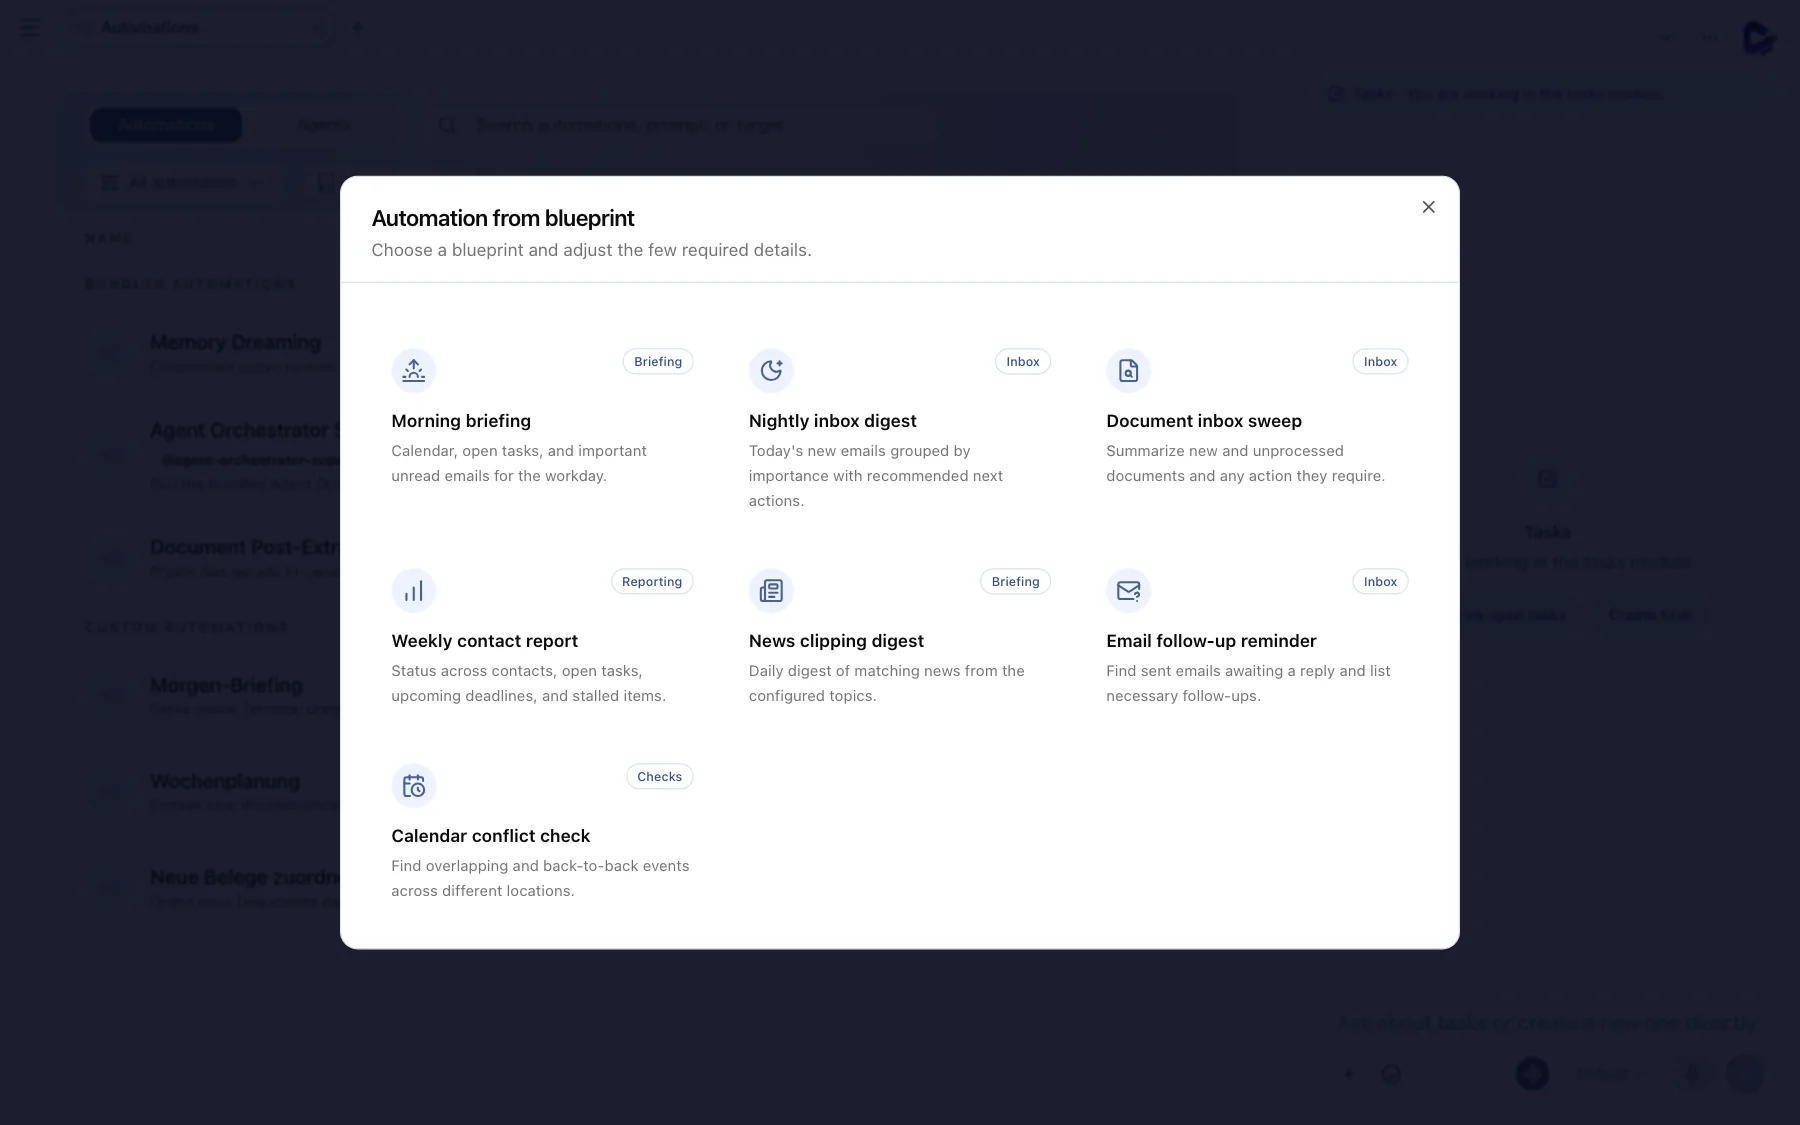
- Blueprint – for example Morning briefing: your calendar, open tasks and important unread emails for the working day. Other blueprints: Nightly inbox digest, Document inbox sweep, Weekly contact report, News clipping digest, Email follow-up reminder and Calendar conflict check.
Blueprints are under + New → From a template below the input. Choose a blueprint, adjust the few details it needs – such as the time or weekdays – and save.
Editing an automation
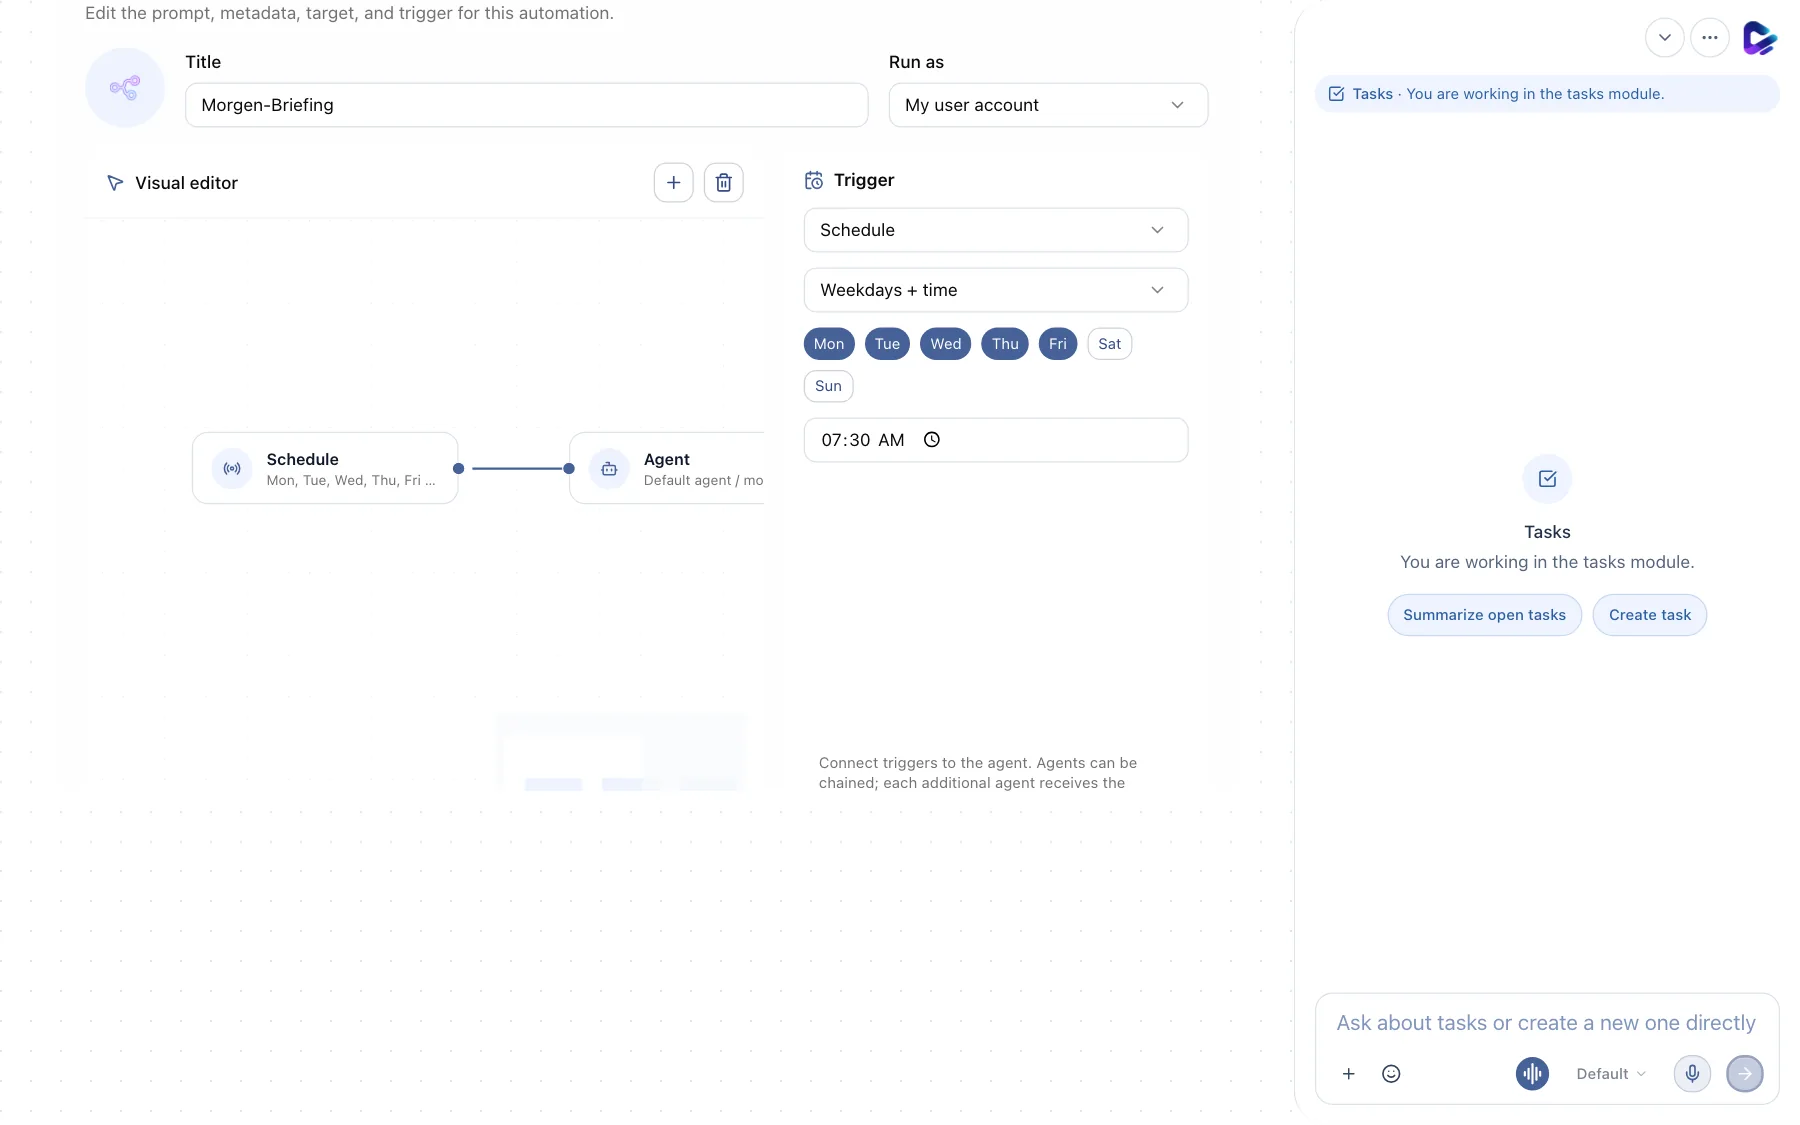
- Run as – on whose behalf the agent works: with your user account (access to your mailbox and your calendar) or – for admins – as the team agent.
- Visual editor – shows the flow as a chain: trigger → agent → output. Use the plus button to add more agents, skills or outputs; each agent receives the result of the previous one.
- Trigger – when the automation starts.
The most important settings:
- Title and Automation prompt – what the agent should do, in plain language. Example: “Summarize my appointments, urgent tasks and emails that need a reply for today.”
- Trigger – Schedule (once, at an interval or on weekdays at a set time), New email, New document, New calendar entry, Webhook for calls from other systems, or Home Assistant when a device changes state. For New document you can pick a folder from Dokumente, Google Drive, OneDrive or network storage (NAS) (optionally including subfolders) and choose whether new files, changed files or both start the automation. Files moved into the folder count as new. Clapilot checks network storage folders about every 30 seconds; files that are already there when you create the automation do not start it. For Home Assistant you pick an entity, such as a motion sensor, and optionally a From state and To state (for example off → on); without them, any state change starts the automation. Changes from or to unavailable only count when you enter them explicitly.
- Condition – optional for every trigger except Schedule: describe in your own words when the automation should run, for example "only when the email is an invoice over €1,000" or "only when the appointment is a client meeting". The decision model checks every matching event in about a second; the automation starts only when the condition is met. Certainty (50, 70 or 90 %, default 70 %) sets how sure the model must be – higher means fewer runs. If no decision model is set up, the automation runs as if there were no condition. In the visual editor the trigger then shows with condition.
- Model – which AI model the automation uses.
- Target – where the result goes: to your Main chat, to a Team chat channel or to the Feed when the Feed module is installed. In the Feed the result appears as a post by the automation that links back to it; in the graphical editor add a dedicated end step with Add node → Feed post (or pick the Feed target on an output step) and optionally give it a title such as Daily summary and a Feed topic such as Daily update. One automation can deliver to the chat and post to the Feed at the same time.
- Pre-approved actions – actions that would otherwise need an approval, such as sending an email, can be allowed in advance for this automation. That way it runs through even at night without asking.
The Run log tab shows every run with its result and refreshes every five seconds.
Tip: You can also create automations in the chat: “Remind me every Monday at 8 AM about weekly planning.”
Segmenting images (SAM 3.1)
With the Segment step, an automation finds objects in new images and cuts them out – without an AI agent, so without model costs. It uses Meta SAM 3.1, running on your own compute cluster.
- Choose New document as the trigger, optionally with a folder where the images arrive.
- Add Segment with the plus button and enter what to look for – a short term such as person, product or red car, not an instruction.
- Choose the Results: an Overview with each match highlighted in color, Cutouts (each object as a PNG with a transparent background) and, if needed, Masks. Maximum matches and Minimum confidence control how much is found.
- Connect the step to an Output to receive the images directly in chat. Or add an Agent after it: it receives the matches and can keep working with the cutouts, for example describe them.
- With Save to Documents, Clapilot also files the overview, cutouts and masks as documents in a folder of your choice. These documents never start an automation with a segmentation step, even when that folder is watched.
If Home Assistant is set up, you can also choose a Home Assistant camera (live) as the Image source. The step then takes a current still image on every run – for example every 10 minutes on a Schedule, or with the Home Assistant trigger as soon as a motion sensor fires. The preview in the step shows the current camera image.
Files that are not images are skipped. Admins set up the connection to the segmentation service under Settings → Image generation → Segmentation (provider Clapilot Cluster Studio with its address and sign-in). The step shows whether the segmentation service is reachable. In chat you can also ask the agent directly: “Cut out the person in this photo.”
Specialized agents
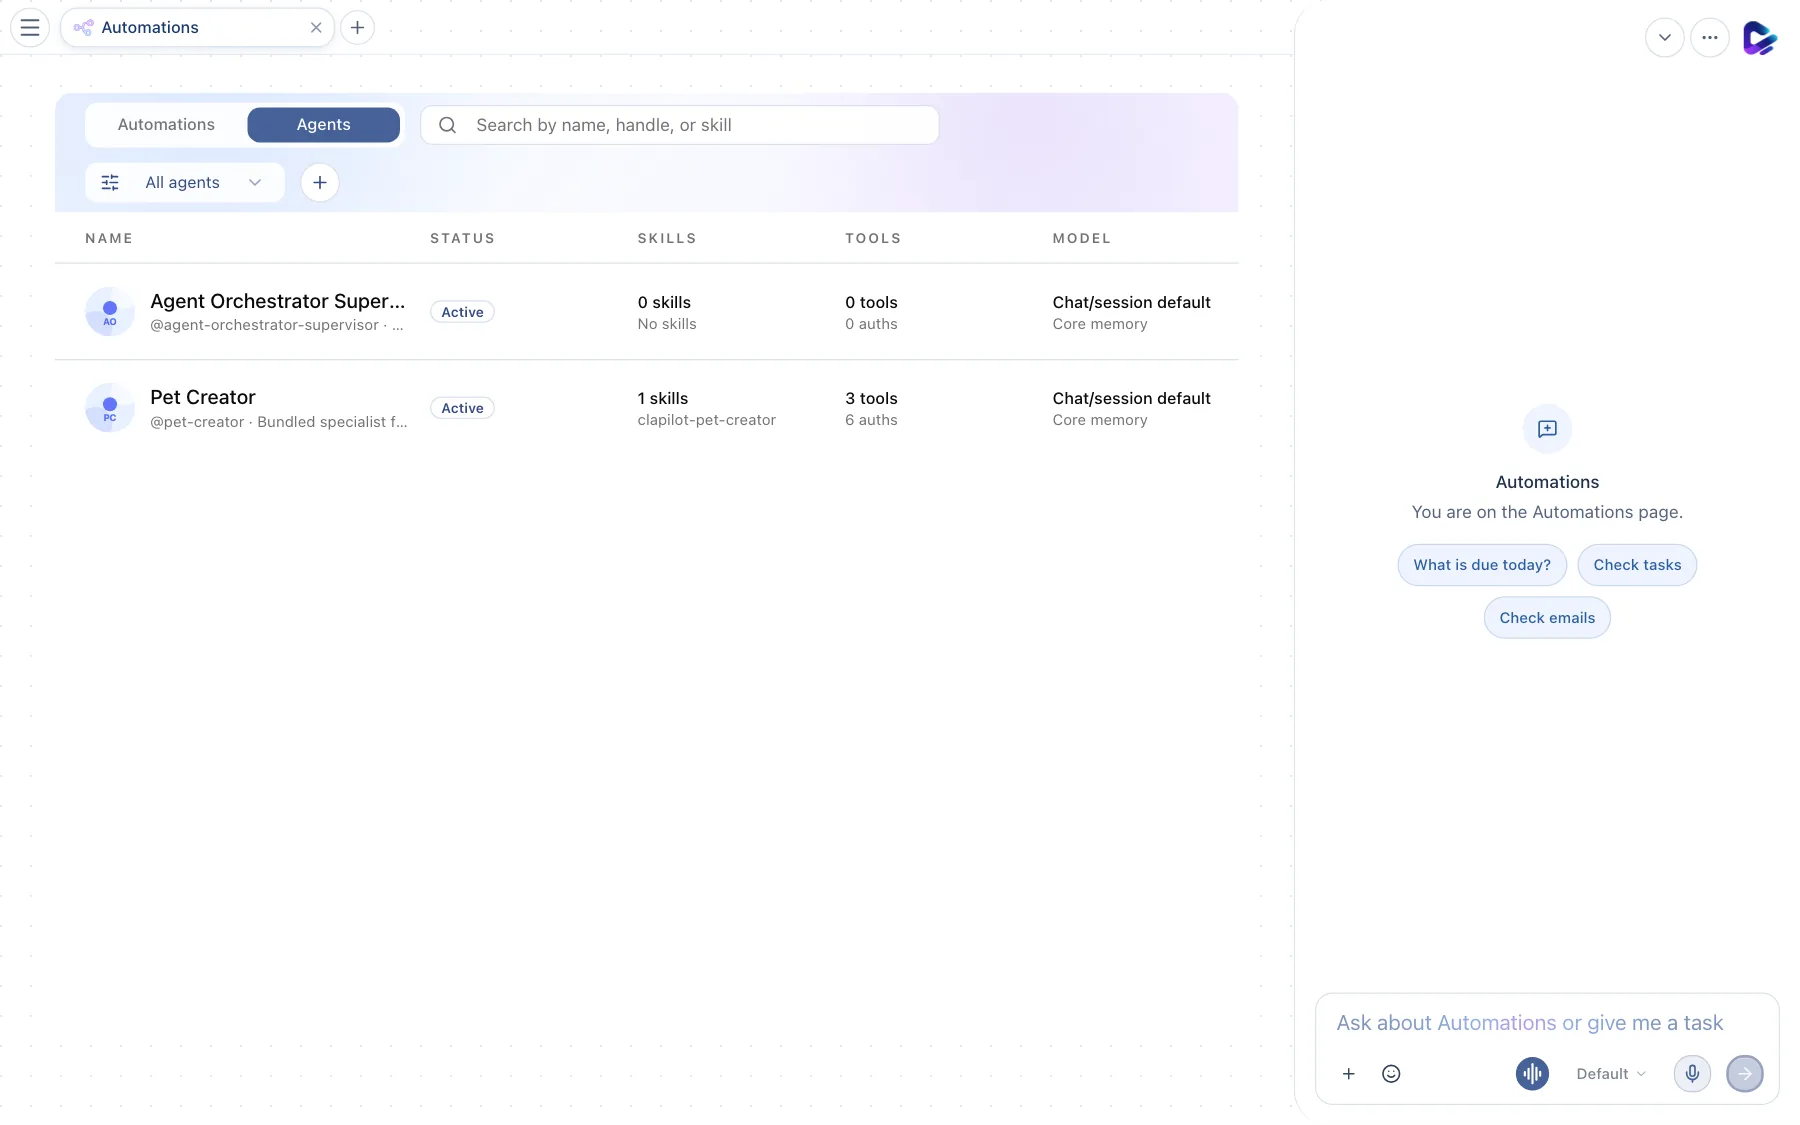
- Agents – the list of specialized agents in this instance.
- Specialized agent – with its handle (such as
@pet-creator), status, number of Skills and Tools, and the Model it uses. Click it to open its settings.
A specialized agent gets a clearly defined job, its own skills and tools, and its own memory. You address it with @handle in Chat or Team Chat, invite it to channels or let it work in automations. Specialized agents can also be connected to channels such as Telegram or WhatsApp. You create new specialized agents with + New – with the same wizard as automations (see Creating a new automation); Create manually opens the full editor with model, skills, tools and channels; ready-made agents are in the Store under Special Agents.
Specialized agents can also consult each other: under Can consult in an agent's settings you choose which other specialized agents it may ask directly while it works. It gets their answer back and continues with it. Without a selection, an agent asks no one.
Find permissions quickly: Above the tools in the agent editor there is a search for tools, access and skills, next to an All / Active / Inactive filter. The search finds areas, tools (by name or description) and skills; when it only hits a tool inside an area, that tool is named under the area. While a search or filter is on, Select matches and Clear matches only change the entries shown.
Wake-up triggers
With wake-up triggers in a specialized agent's settings, the agent becomes active by itself when something relevant happens – nobody has to @mention it. Under Add trigger you pick the event:
- Team Chat message – someone writes a message with one of your keywords (for example “invoice”) or about a topic you describe as a condition. Without a room selection the agent listens in every room it is invited to. It answers in the message's thread; replies in that thread reach it afterwards without an @mention.
- New email, New document, New calendar entry – as in automations.
- GitHub – new issues, pull requests, CI results and more. Enter the URL and secret shown in GitHub under Settings → Webhooks.
- Webhook – another system calls the URL shown.
Agent decides by its role (on by default for Team Chat triggers): the decision model reads the agent's description and instructions and checks every event – should the agent act here? Small talk, thanks, messages meant for specific colleagues or other topics do not wake it; in Team Chat it also reads the latest messages. So you need no keyword list: with the role check on, the decision model checks every message and the keyword field is hidden. Without the role check, keywords pre-filter; Suggest derives fitting keywords from the agent's role, which you add with a click.
A condition is optional: the decision model (Settings → ClapilotAICore → Decision) checks every event, and the agent is only woken when it judges the condition met. The dialog shows which model checks it and warns when none is set up. The task when woken is optional too: without it the agent acts on its own instructions.
A wake-up trigger is active right away. When several agents listen in the same room, the decision model checks each message once for all of them and wakes exactly the agents whose role it fits. Messages from agents never wake another agent, and a message with an @mention always goes to the mentioned agent.
The trigger log shows when which agent was woken and why the others were not. Open it in Spezial-Agenten with the activity icon next to + (all agents) or with Log in an agent's wake-up section (that agent only). For every message and other event it lists, per agent, for example woken, no keyword, not responsible 0.33 or check failed; a click shows keywords, probabilities and thresholds. Entries are kept for 14 days. You can also ask the agent: "Why didn't Bjoern react to my message?"
Agent schedules
For “keep checking” you do not need an automation: just ask the agent, for example “@Astra, check https://example.com every 30 minutes for the next 2 days and tell us when something changes.” The agent sets up a schedule for it itself – at an interval (at least 5 minutes), at set times or once – and reports in the same Team Chat room or chat. When nothing is new it stays quiet; each run knows the earlier ones and reports only what changed. Once the goal is reached, it ends the schedule itself.
All schedules of an agent are listed in its settings under Schedules: task, rhythm, end, room, next and last run. There you pause a schedule, run it right away, delete it or add one yourself with Add. Schedules for a Team Chat room are visible to everyone who can read the room; schedules for a personal chat only to you.
What you can ask the agent
- “Check our pricing page every 30 minutes for the next 2 days and report changes.”
- “Send me a morning briefing in my main chat every weekday at 7:30 AM.”
- “Which automations are active, and when do they run next?”
- “Pause the weekly planning until the end of the month.”