

Working with the agent
Chat, chat dock, sessions, mentions, approvals and good instructions – how to use the AI agent as a colleague.
Open in ClapilotThe agent – in a new Clapilot instance it is called Angela, and your administrators can change the name – is not a search box but a colleague with access to your workspace. It reads emails, creates tasks and appointments, finds documents, prepares replies and operates installed modules. You can reach it in three places:
- in Chat (Menu → Chat, or click a conversation on the left twice) for longer conversations,
- in the chat dock to the right of every page for questions about the current page,
- in Team Chat when you mention it with
@(see Team Chat).
The chat
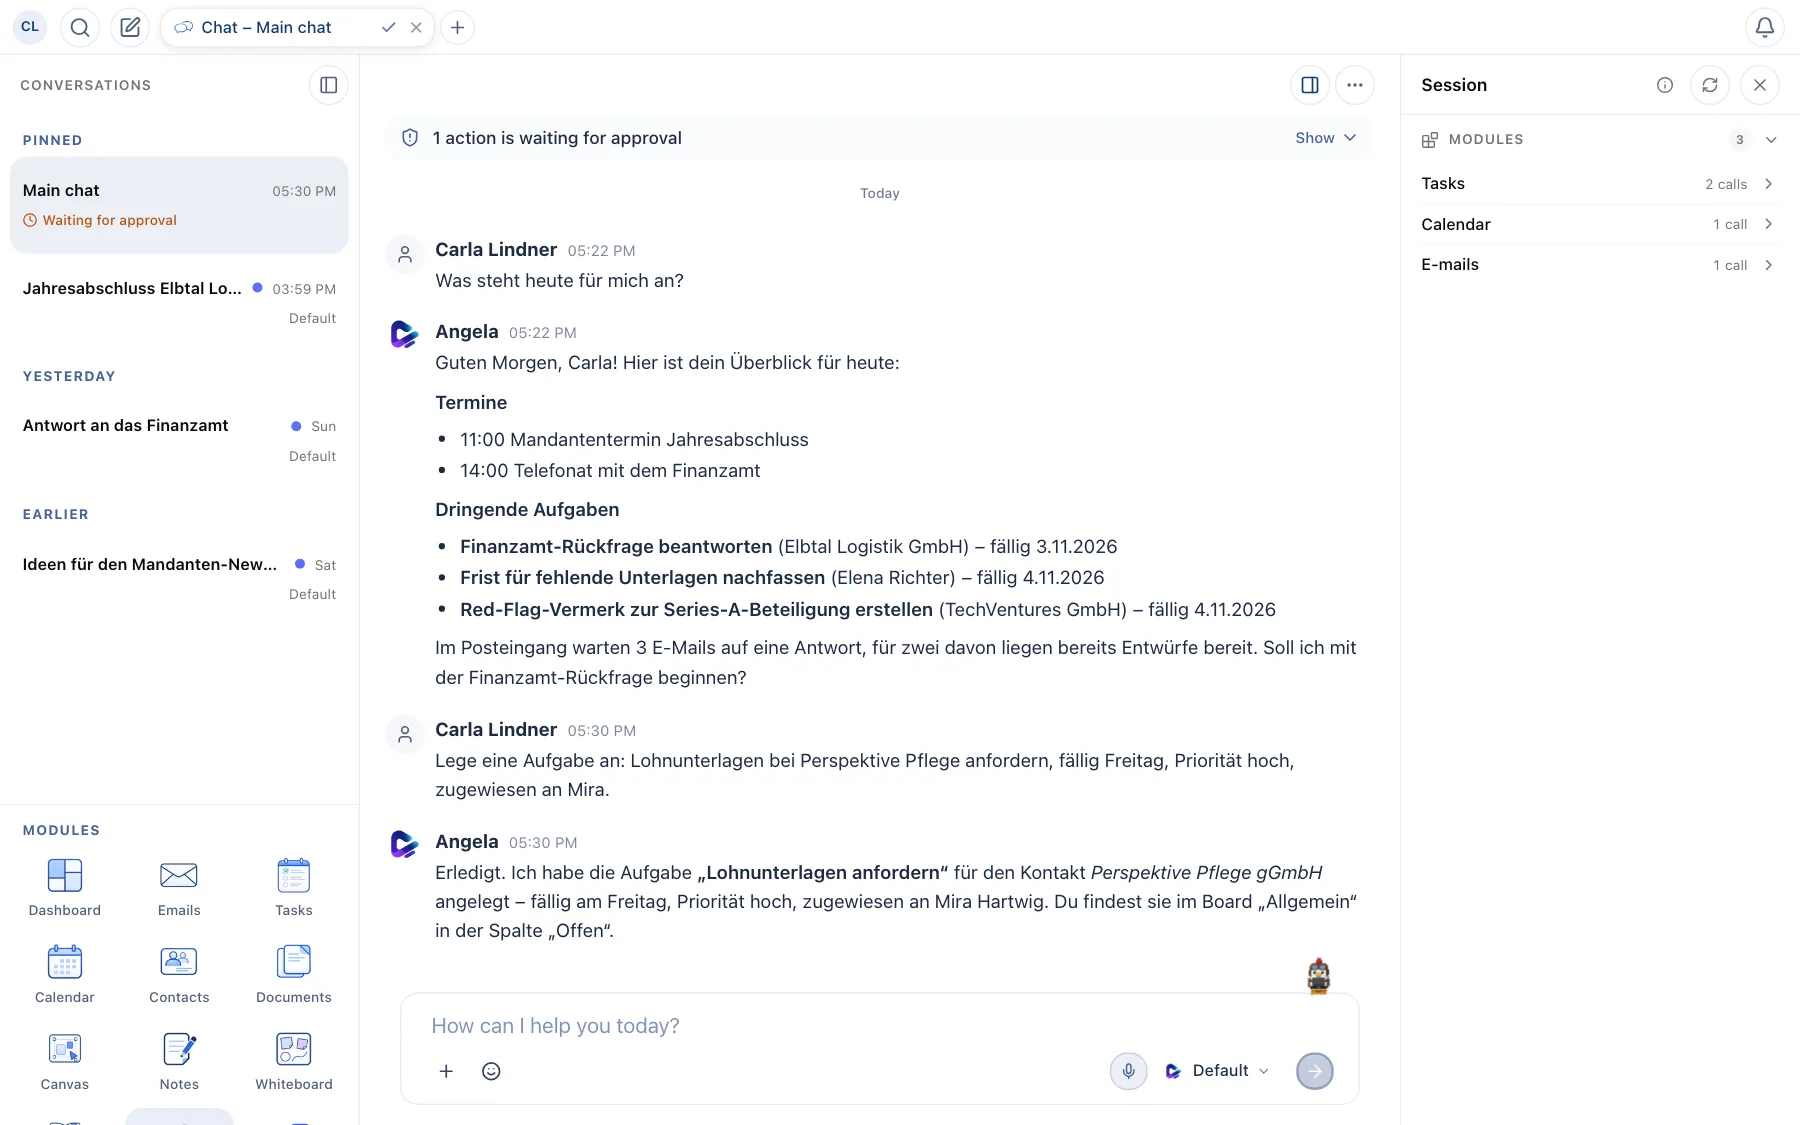
- Your message – what you asked or asked the agent to do.
- Agent's reply – here a daily overview with appointments and urgent tasks, which the agent put together from your calendar, tasks and inbox.
- Completed action – the agent tells you what it changed and names the item. After this instruction, it created a task that appears on the task board right away.
- Session – shows on the right which modules and tools the agent used in this conversation; click an entry to see the individual calls. The cross hides the overview.
- Input field – type here. Enter sends, Shift + Enter adds a new line. The plus button opens a menu: Local files from your device, Clapilot documents from Documents, and Drawing. Drawing opens the whiteboard in place of the conversation – with pen (Apple Pencil too), shapes, text and sticky notes; Done attaches it to your message as an image. The Apple apps add Photos from your library. You can also simply drag files onto the field. The same menu is available in coding mode.
- Model – shows which AI model is replying. Default uses the model your administrators set up; below it are the models you can pick yourself, with their name and a short description. Your choice applies to this session. If your administrators take a model off the list, the chat replies with the default model and shows a note. If a model is only unavailable for a while, the chat replies with the default model, says so, and keeps your choice for the next message. If you only see Default, your administrators have not made other models available yet.
- New chat – starts a fresh conversation. On wide screens it sits at the top of the Conversations list and, as a pen icon, at the top left beside search; in the Mac app it sits at the bottom left of the list. The list to the left of the chat shows your sessions with their time and model. The sidebar icon folds the list into a narrow rail. In coding mode the same list shows your coding sessions with their repository, where they run, how many tool calls they made and an icon for Codex, Claude or Clapilot Code; the same button then starts a new coding session, and the icon at the top right opens the session panel with status, branch and the changed files. On a phone, the arrow at the top opens the list. The three dots offer more options.
While the agent works, you see its progress. If you want to see every single step, turn on Show agent tool calls in chat under Settings → Profile. Feel free to keep writing while it works: Clapilot queues new messages, and Send directly pushes a message through immediately.
Watching the simulator live
When the agent starts an iOS simulator for you on a connected computer, you watch it live. In the chat it appears in the sidebar on the right; if the session overview is open there too, switch between Simulator and Session at the top. Clicking the picture taps the simulator, the text field types into the field that has focus, and Back and Home sit next to it. The pop-out button moves the simulator out of the sidebar into a floating window, which you move by its header and resize from its lower right corner. The sidebar button in the window docks it again. In other modules and in the chat dock the simulator always shows as a floating window. Drag the chat sidebar's left edge to make it wider or narrower; Clapilot remembers the width in this browser. In the Mac app the simulator also sits in the chat's sidebar and can be popped out into its own window. Hiding the simulator does not end its session.
Sessions: separate conversations
You can keep a separate session for each topic – for example one for a client's annual accounts and one for the newsletter. This keeps the context clean, and the agent doesn't mix things up.
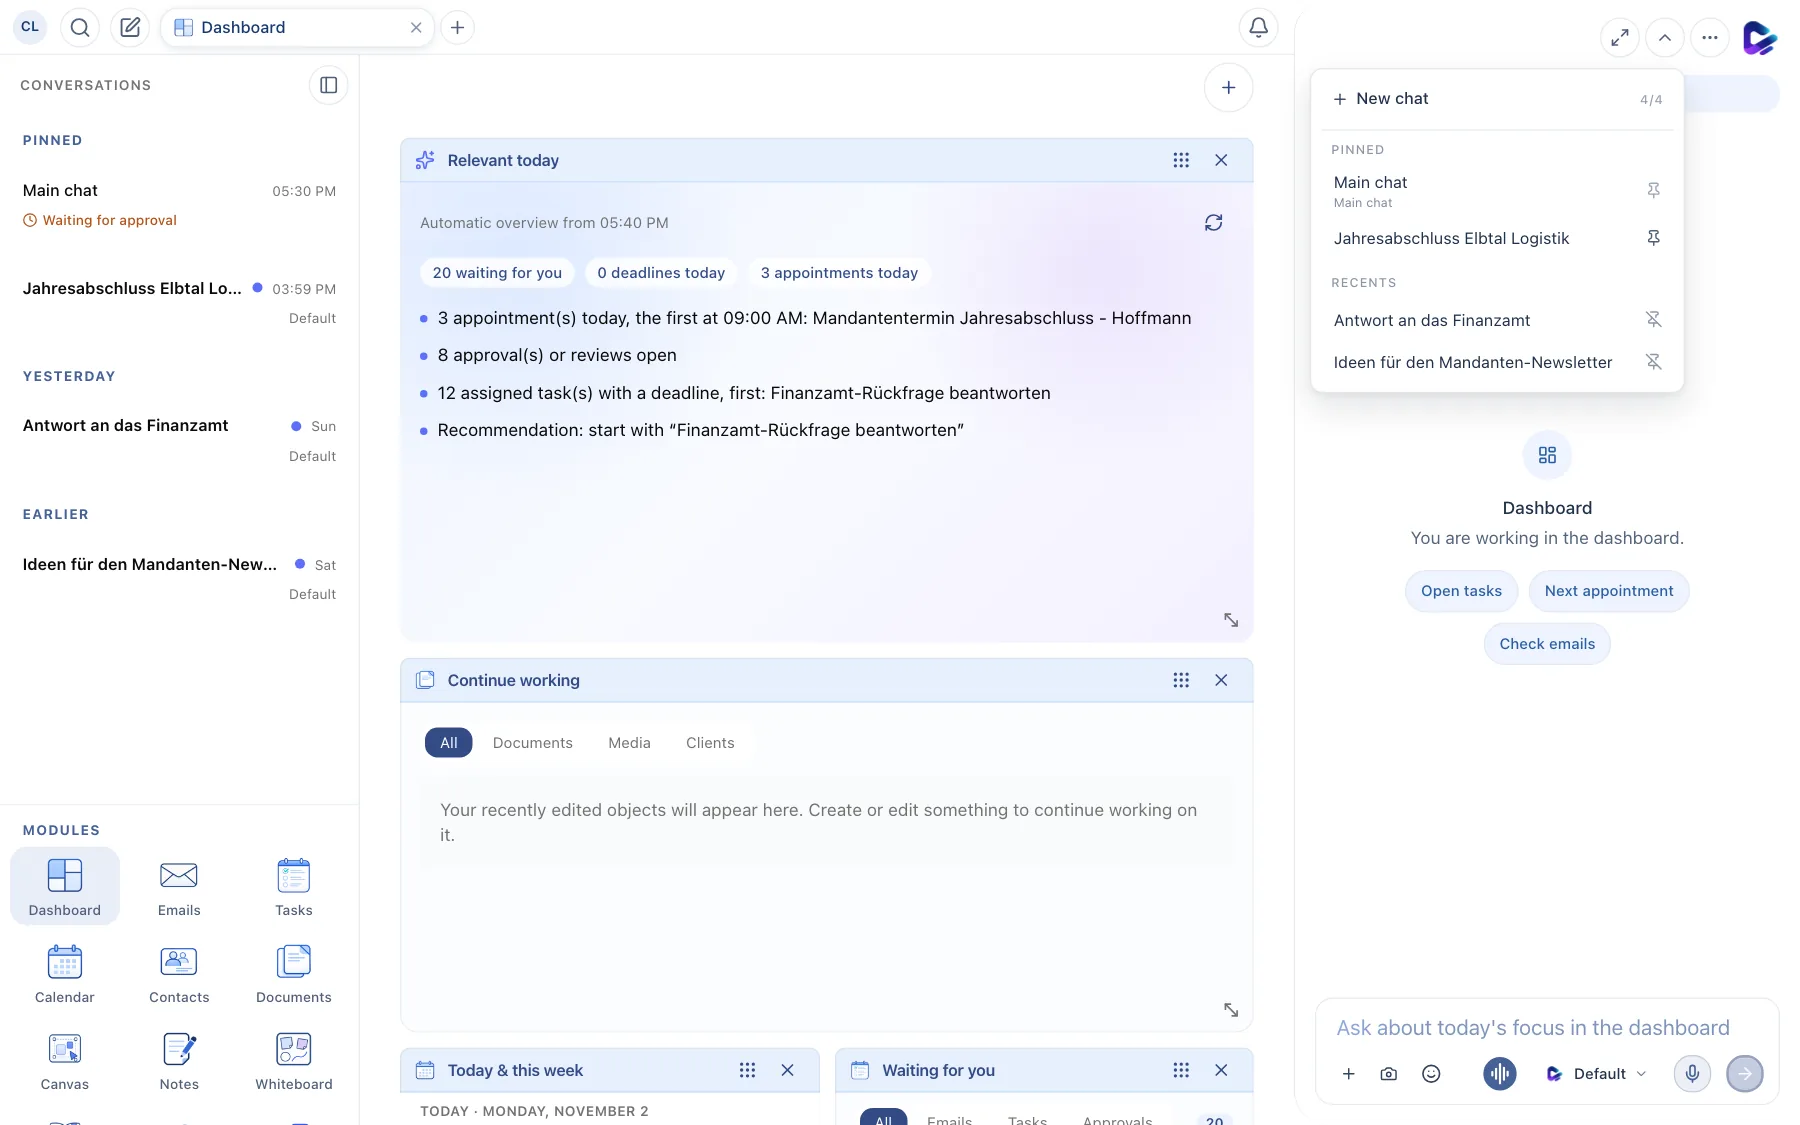
- Session selector – opens the list in the chat dock or in Chat.
- New chat – creates a new session.
- Main chat – your default conversation. It is always pinned; automations and the heartbeat report here by default.
- Pinned – sessions you want to keep at the top. The pin on the right pins or unpins them.
- Recents – your other sessions, newest first. You can rename or delete a session from its menu.
Chat with a special agent
New chat → Special agent opens the list of your special agents. Pick one to start a new conversation that belongs to that agent: every message goes straight to it, no @ mention needed. Instead of the model picker the composer shows the agent's picture and name, and the Conversations list shows its name in place of the model. Mention another agent with @ in that conversation and the mentioned one answers that message. The entry is available on the web and in the iPhone, iPad and Mac apps as soon as at least one special agent is enabled.
Fork, archive and delete
Right-click a session in the Conversations list (in the apps: long-press, or right-click on the Mac) to open its menu:
- Fork – starts a new session that takes the conversation so far and the agent's context with it. Use it to try another direction without changing the original conversation. The fork is listed, indented, under the session it came from, and goes its own way from there.
- Archive – takes the session out of the list without deleting it. Archived sessions are in the folded Archive section at the end of the list; Restore brings them back.
- Delete – removes the session and its history for good (choose it a second time to confirm). Forks of a deleted session stay.
You can fork the main chat, but not archive or delete it.
Your chats with the agent are personal. Other team members can't see them.
If you also message the agent through WhatsApp, Telegram or another messenger, those direct messages land in one of your sessions – the main chat by default. That session then shows the messenger's icon, and every message from there carries the same icon. So you see the conversation on the web and in the app too, and you can keep writing there in the same context. Your administrators decide which session is used (see Administration).
Projects: one place per topic
When you work on several topics at once – marketing, taxes and an app release, say – create a project for each. A project has a goal, the agents in charge and a Recent activity log. Every chat in the project knows this context, so you no longer explain it again in each chat.
- Create a project – the + next to Projects in the Conversations list opens New project: name, type (Internal or Customer), rhythm (one-off, ongoing, recurring), goal and agents. For Customer, pick a contact from Contacts or type a new name – the contact is then created with the project. With the instance's developer mode on, the Development section lets you pick an existing task board or create a new one and link a repository (from the list or as
owner/name). Every picker can be searched; picking a board or repository names the project after it until you type a name yourself. - Chats in a project – your chats are listed under each project, followed by New chat in project. Move an existing chat with right-click → Move to project; Undo in the notice reverts it right away. The composer shows Project: …; click it to see what the chat knows about the project.
- Project overview – click the project name to see the goal, the log, agents, task board and repository, and your chats in the project. Use ⋯ to edit, complete (listed under Completed at the end) or delete the project. Deleting keeps the chats.
- Wiki and Feed – every project gets its own project page in the Wiki when it is created. Wiki pages and Feed posts can belong to a project; in the Wiki and the Feed you filter by project at the top. New pages and posts land in the filtered project automatically. In the project overview, Wiki & Feed takes you straight there.
- Goal and log – agents record results under Recent activity; you can remove entries at any time. An agent never changes the goal itself: it makes a suggestion you accept or dismiss.
The whole workspace sees projects unless you turn on Only me. Your chats stay personal: in a project, everyone only sees their own. When an administrator links a repository and a task board, the link also applies in the Agent Orchestrator. You can also ask the agent directly, for example: “Create a project for f1rede/clapilot and move this chat into it.”
The chat dock
The dock on the right knows the current page. On the task board, the agent knows you are in the Tasks module; in an open email, it knows exactly that email.
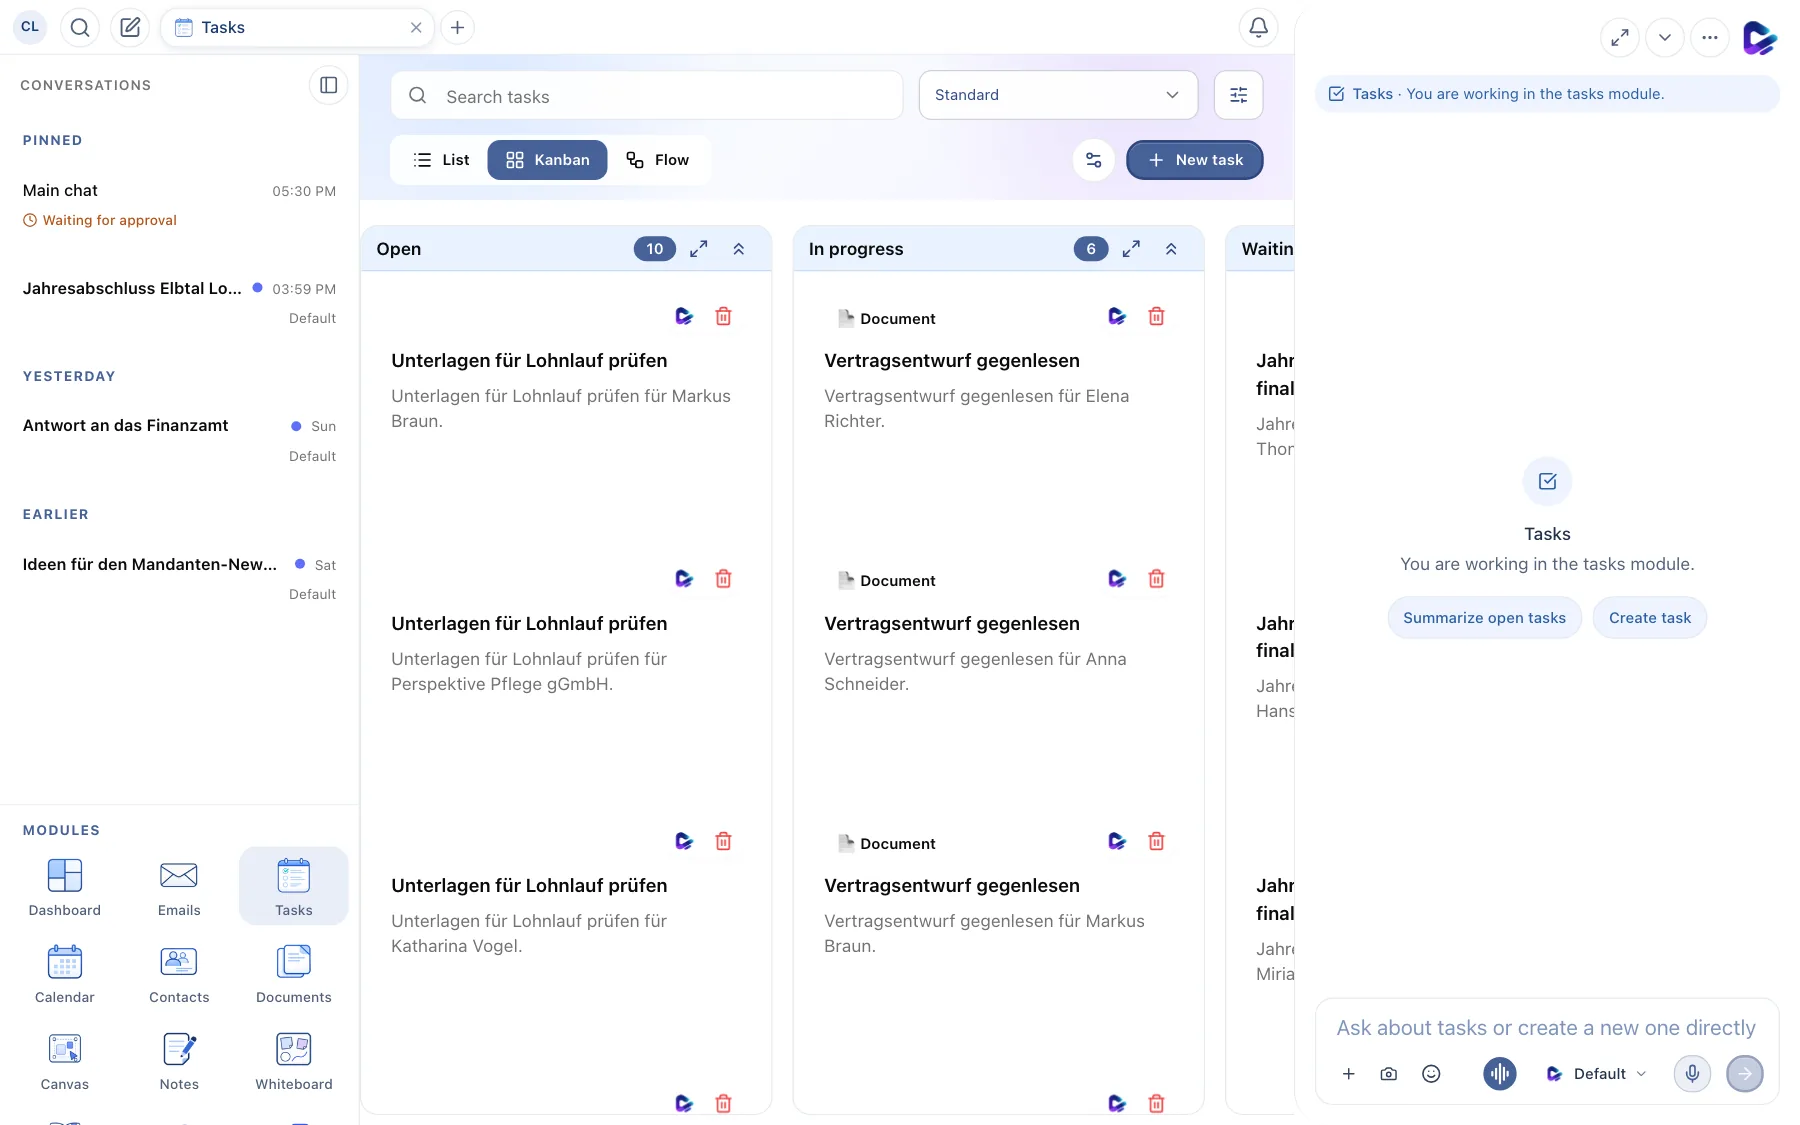
- Context – shows what your question refers to.
- Matching suggestions – change with the page, for example Summarize open tasks in Tasks or Improve reply in an email.
- Input field – works like in Chat.
- Attach – the same menu as in the chat: local files, Clapilot documents or a drawing, plus Current view (app shot) in the dock.
- Start conversation – starts a live voice conversation. This is available once your administrators have set up a voice provider.
- Dictate – speak your message; it appears as text in the input field.
App shot – the Current view entry in the plus menu captures the current view to the left of the dock (without the menu and the chat) and attaches it as an image to your message. The agent then sees exactly what you see, for example a layout problem in Canvas. The browser asks each time whether it may share this tab; Chrome and Edge preselect the tab. App shots are available only in the chat dock (also in the Mac and iPad apps), not in the full-screen chat or in Team Chat.
Mentions, commands and references
In the input field, four characters open a picker:
| Character | Opens | Example |
|---|---|---|
@ | Mentions: the main agent and specialized agents, and in Team Chat also people | @angela, @pet-creator |
/ | Skills and commands installed in your instance | / and then choose the skill |
# | References to documents, contacts and other items | #Jahresabschluss |
: | Emoji | :thumbs |
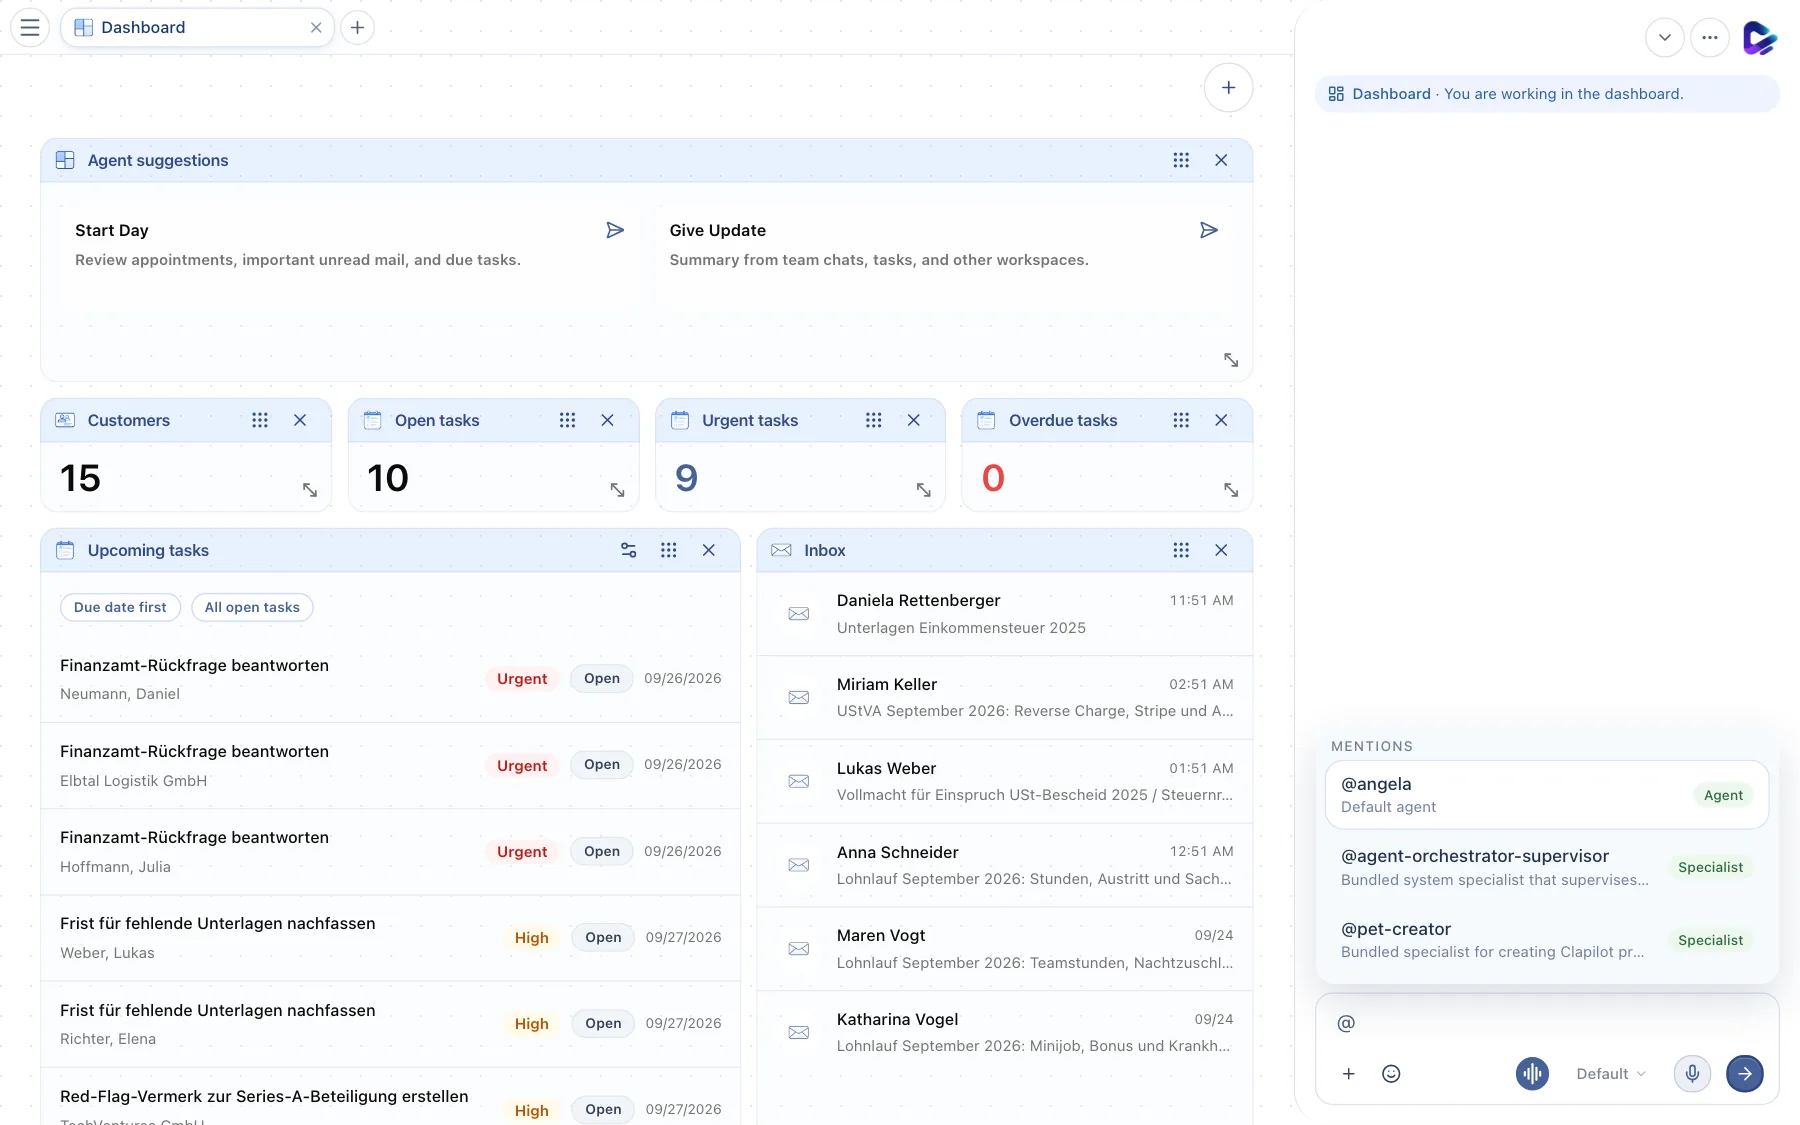
- Mentions – after
@, Clapilot lists the main agent and all specialized agents. Use the arrow keys and Enter to choose. - Input field – your choice is inserted at the cursor.
With a mention, you hand a task to a specific specialized agent, for example an agent that only handles social media posts.
Follow-up questions as a form
When the agent needs several details at once – for example a file number, a deadline date and the type of deadline – it shows a small form in its reply instead of asking one question at a time. Required fields are marked with *; date fields, drop-down lists and yes/no switches work as everywhere else in Clapilot. Submit sends your input to the agent as a normal message and locks the form – also after a reload, on your other devices and, in Team Chat, for every member. The same goes for choice buttons: the chosen answer stays marked. Submitting does not trigger an action by itself: anything the agent then does that reaches the outside world still needs your approval. In Telegram or WhatsApp, the form appears as a list of fields that you fill in with a reply.
Approvals: before the agent acts
The agent never carries out actions that reach the outside world or can't be undone without you. Before it sends an email, a fax or a letter, deletes data, publishes something or places an order, an approval card appears. The same applies when the agent changes a standing setting that applies to everyone in a shared space – for example when it sets or removes the channel prompt of a Team Chat channel. The card then shows the channel, the agent, the change, a preview of the new prompt and the current one. The agent also asks before it starts a browser or an iOS simulator on a connected computer that isn't yours; the card names the computer and its owner.
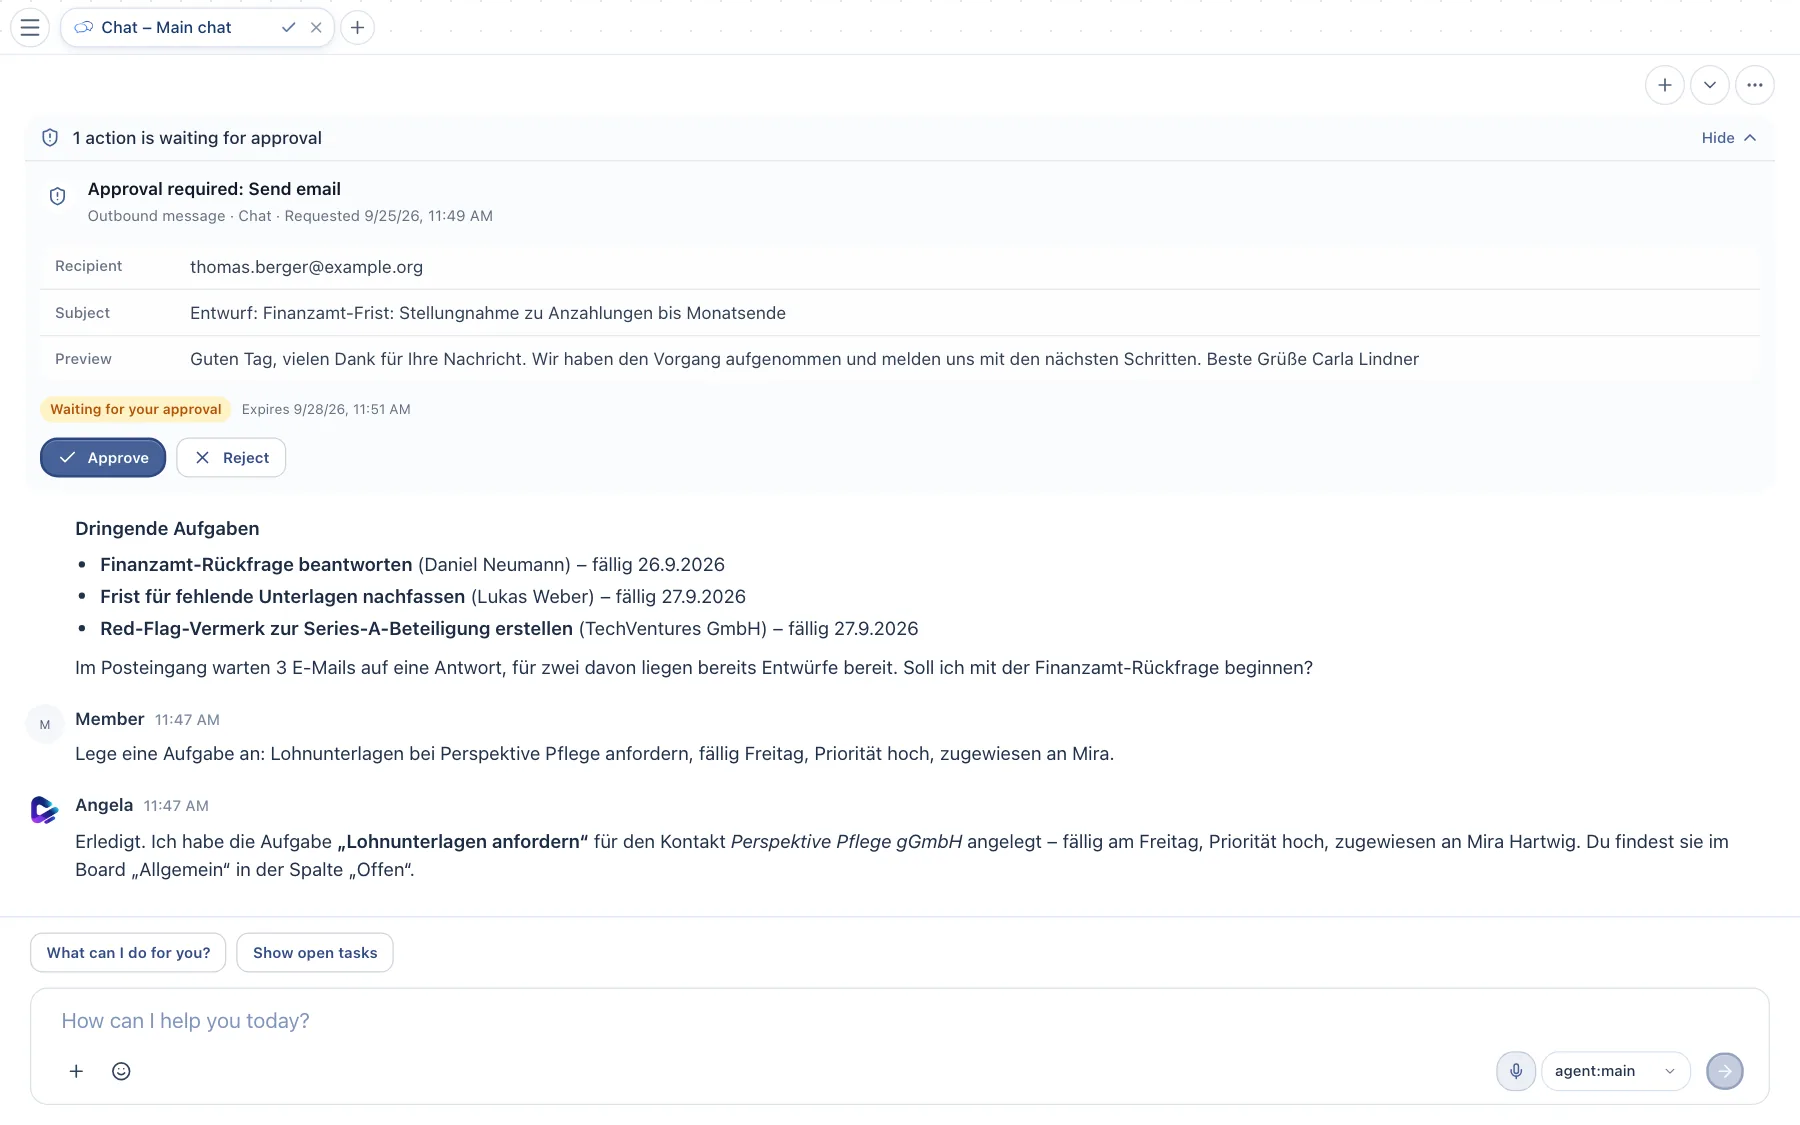
- Approval required – names the action, here Send email.
- Details – recipient, subject and a preview of the content. Check these details as you would for your own email.
- Approve – the agent carries out the action immediately, and the card shows the result.
- Reject – nothing is carried out; the agent learns that you declined.
Pending approvals stay valid for 72 hours. They also appear when the agent has been working in the background – for example in an automation – and as a notification on your smartphone. In channels such as Telegram or WhatsApp, you simply reply with the approval's number. For recurring automations, an action can be approved in advance (see Automations).
Writing good instructions
The agent works best when it knows the goal, the context and the result you want.
| Instead of … | … better |
|---|---|
| “Tax office” | “Summarize the latest email from Finanzamt Hamburg-Mitte and create a task with the deadline.” |
| “Appointment tomorrow” | “Block tomorrow from 2 to 3 PM for the Elbtal Logistik receipt review.” |
| “Reply” | “Reply to Miriam Keller's email in a friendly tone, confirm we received it and suggest two times next week.” |
More tips:
- Use names when you know them: contacts, documents, boards. With
#you insert an unambiguous reference. - Correct instead of starting over: Write “shorter”, “more formal” or “without the second paragraph” – the agent revises its last result.
- Ask about the result: “What did you change?” returns a list of the items it created or edited.
- You remain responsible for the content. Check legal, tax-related and outgoing content before you approve it.
What the agent remembers
The agent learns stable facts from your conversations, such as preferred phrasing or who is responsible for which client. Under Settings → Profile, Share my memories with the team decides whether new insights from your conversations are available to the whole team. Private memories stay private.
If you want the agent to check in on its own regularly – for example with reminders about overdue deadlines – set up the heartbeat.